Design and principle of operation of a walk-through switch
The design of a feed-through switch does not differ much from a standard switch. On the outside there is no difference at all, but inside you can see an additional contact, which provides the necessary functionality. With this option, you can make controlling the light in the apartment or house much more convenient. The main thing - to understand its features and connect it correctly.
What is a walk-through switch and how it works
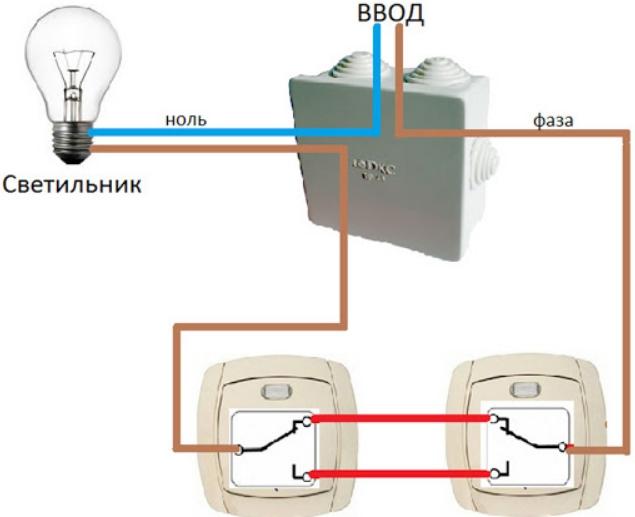
This type differs from the standard. If in the usual version, the electric circuit simply closes or opens, then in the equipment under consideration it switches from one contact to another. The system can be called a switch because it changes modes, rather than working like classic products. The principle of operation of the pass-through switch is as follows:
- Unlike the standard version on the back side of the single-key model is located not two, but three contacts. And an additional contact is needed so that when one circuit closes, the second circuit closes and control is transferred to a second element located elsewhere in the room.
- These switches are always used in pairs. There cannot be less than two, otherwise there would be no point in using them. The system works by means of toggle contacts that act like a rocker.
- Normally, the light is on when both switches are in the same position. When the keys are positioned differently, the lights turn off.
- An indispensable element in this case is a junction box. Through it is made a system that allows you to turn on and off the light from different places in the room.
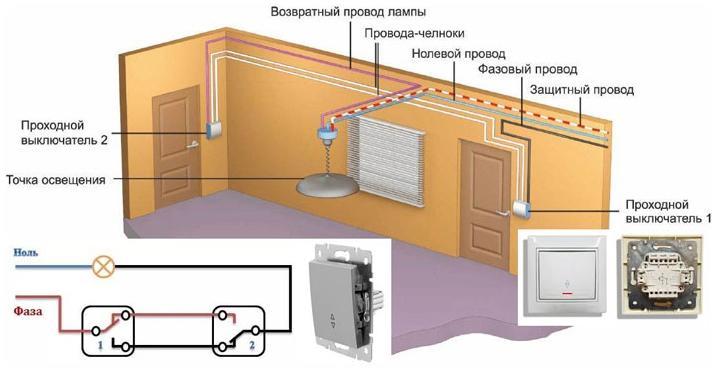
By the way! On the outside of the pass-through switch is usually marked in the form of triangles, the tops of which are directed upwards and downwards.
How the switches are arranged
The main difference from the standard equipment is the extra contact on the back side. Externally, the device is no different and if it is not marked, it is impossible to understand that it is a loop-through switch.
Due to the presence of an additional element, it is possible to switch the circuit from one contact to another, so you can control the light from two or more devices. It's simple enough - when a contact in one switch closes, the same thing happens in the other.
The devices can be single- or double-button or more. There are no special restrictions, it all depends on the lighting modes and the number of light sources used in the room.
Where to use and how to connect it correctly
As for the application, there is no framework. Most often this option is put on the stairs - at the top and bottom, in bedrooms - at the entrance and near the bed, at different ends of the corridor, in the living rooms, etc. Switches can be used wherever it will increase the convenience of light control. However, in order for the system to work properly, it must be wired correctly.:
- First, the switch is disassembledThere are three fasteners on the back side. Two of them are the common contact, which must be found before connection. If there is no diagram on the housing, you can find this out with a tester.
- The common terminal is where the phase is connected. The lead wire is always three-core, as this option will not work with two-core. The other two wires are connected to the other terminals, their location does not matter.
- Next, you need to assemble the socket and install it in place. With the second switch, a similar work is carried out. There is nothing complicated, the main thing is not to mix up the location of the wires.
- It is very important to correctly connect the wires in the junction box. There should be four three-core cables - a power cable, two for the switches and one for the chandelier. The wires are connected according to the diagram below. It is easiest to orient by the color of the insulation, then you can not worry that something will be mixed up.
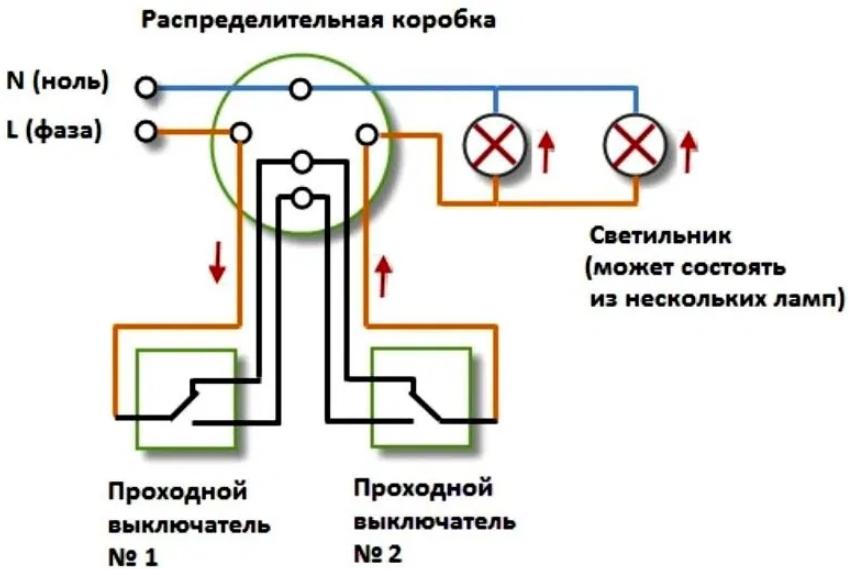
Video: Wiring Diagram for Loop Switches.
What limits the number of loop switches
There are no rigid restrictions on the number of on and off points. But you need to remember the basic principles of electrical equipment. The more connections, the more resistance to current flow is created and the higher the voltage loss. In long circuits this can manifest itself strongly.
Therefore, systems usually use 2 to 5 elements. Moreover, If there are more than two devices, you need cross switches, which have not three but four contacts for connection. They are put between the pass-through variants and provide normal operation of the lighting. The wiring diagram of such a variant is shown below.
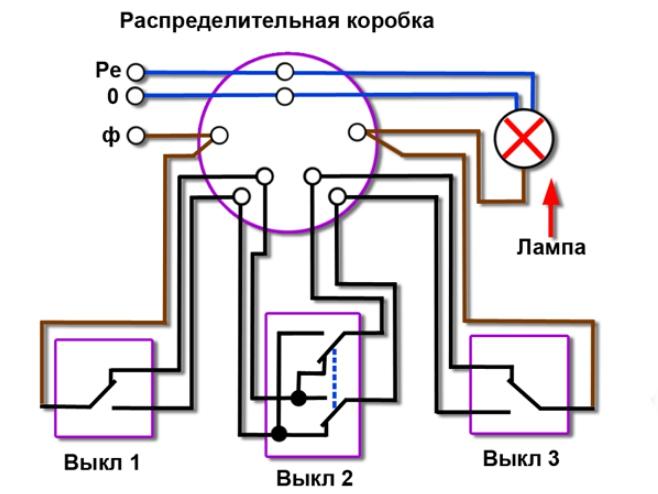
Types of switches and their designation on the diagrams
Products can be divided into different groups depending on the design and features of use. The main variants:
- Mechanical - the simplest and most reliable devices in which the circuit closes and opens by pressing a key.
- SemiconductorThe most common are the touch-sensitive versions. They are triggered by the touch of a finger and look modern. There are also models with a remote control, they are convenient because you can control the light from any place in the room.
According to the number of independent loads, which the switch controls, you can distinguish 2 types:
- Single-line .. The simplest devices with a single key.
- Multilinear, they can have 2 or more keys.
Cross-over models are a type of through-type switch, so they also belong to the equipment group under consideration.
As for the designation on the diagrams, all variants are shown below. It's not difficult to distinguish a walk-through switch from a standard switch.

Advantages of feed-through designs
Using such a system offers a number of advantages:
- Convenient operation, as you can turn lights on and off from different locations.
- Energy savings. Less electricity is used due to the fact that the lights turn on at the entrance and turn off at the exit.
- Easy installation. Almost anyone can install light switches.
- No settings are required, once the wires are connected, the system works immediately.
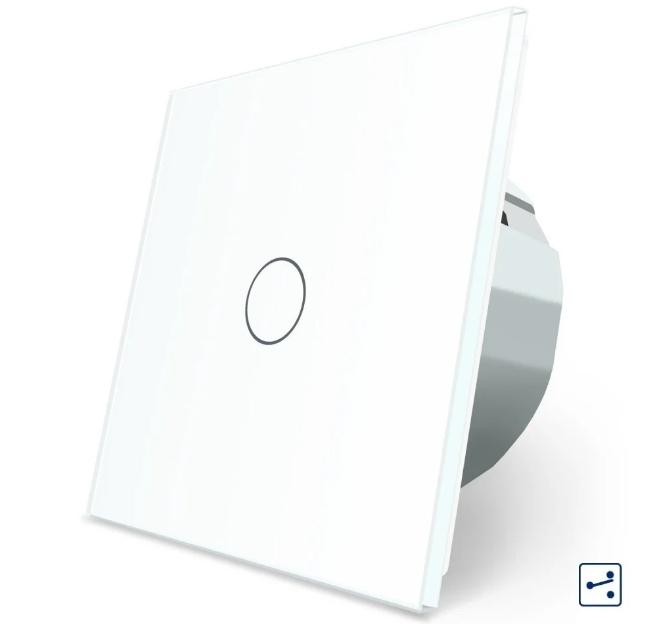
Well-known manufacturers of feed-through switches
There are many options on the market, the best proven products of the following firms:
- Legrand. A French company that produces many varieties of equipment, characterized by reliability and ease of connection.
- ABB .. Joint company from Sweden and Switzerland, producing good electrical equipment.
- Schneider .. Another manufacturer of quality products from France.
- Gira .. German brand with a large range and high quality.
- Vico .. A Turkish manufacturer that makes quality switches for a small price.
We recommend that you take a look at: What is the difference between a feed-through switch and a normal switch.
To understand the peculiarities of the design of the feed-through switch and install it yourself it is not difficult. The main thing is to study the diagram to correctly connect the wires in the junction box and on the switch terminals.
