How a flashlight works
A flashlight is an indispensable tool in everyday life and in industry. Wherever there is a lack of light, it will help you do your work, find a malfunction, or look for a fallen or rolled object. To repair a failed flashlight or upgrade it, you need to know its electrical circuitry.
How a hand flashlight works
The structure of the flashlight is not complicated. It consists of a battery compartment and a compartment with a transmitter and reflector, as well as a power switch.
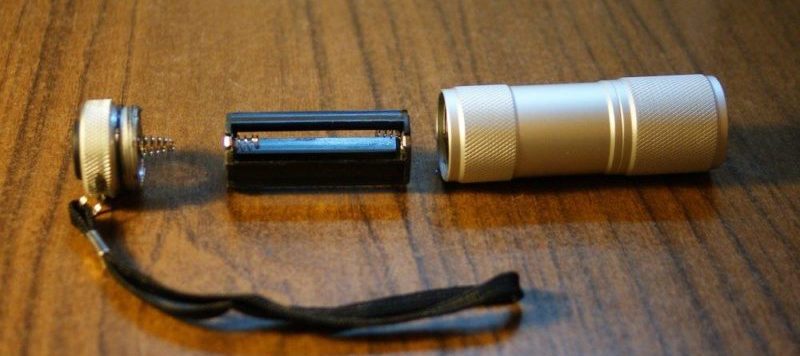
This filling has not changed since the invention of the pocket electric lamp, although the element base has changed dramatically.
Schematic diagram of a simple flashlight
The electrical circuit diagram of a simple pocket flashlight consists of only three elements:
- A battery (or several);
- power switch;
- A light bulb.

Diagram of a flashlight with an incandescent bulb
In modern conditions, incandescent bulbs are intensively displaced by LEDs. They have not withstood the competition because of their lower efficiency and shorter life span. Semiconductor light-emitting elements are also widespread in portable hand-held luminaires. But simply replacing a light bulb with an LED (or a matrix of LEDs) does not work. You need a device that limits the current through the semiconductor elements. This is called a driver and it's an electronic current regulator.
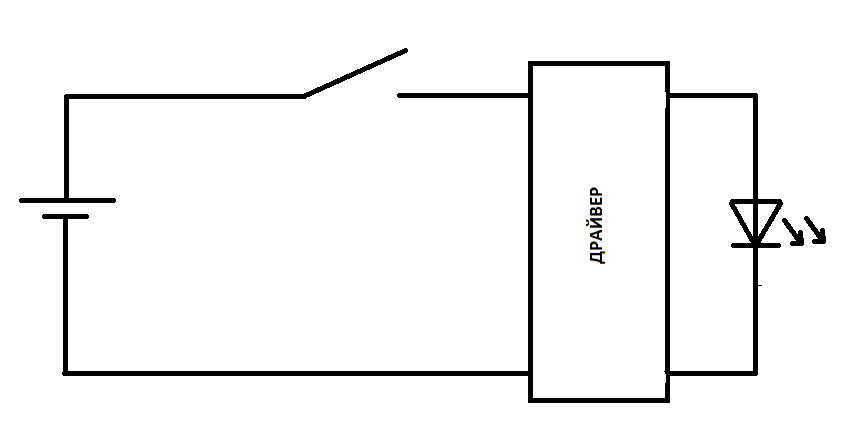
The disadvantage of such a scheme is the low repairability of such a flashlight - to restore the electronic circuit would require a qualified technician and the appropriate laboratory equipment.
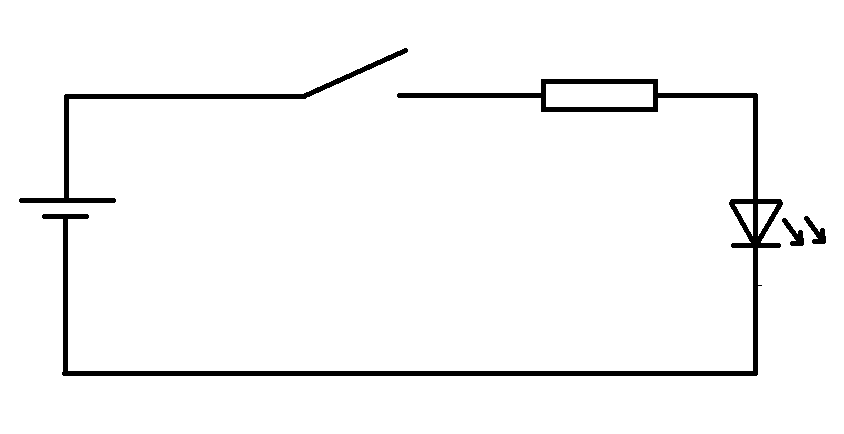
A regular resistor can serve as a driver resistorwhich will limit the current and extinguish excess voltage. But on the resistor will be uselessly lost quite a lot of power. For a mains-powered flashlight this fact is not important, but for a battery or battery-powered lamp this disadvantage can be critical.
Important! In the design of the LED lamp is added another element - a heat sink. Although the radiation of LEDs is not fundamentally connected with the heating, but the law of Joule-Lenz can not be circumvented. As current flows through the radiating elements, heat is released. If left unchecked, overheating LEDs will markedly reduce their lifespan.
Diagram of a headlamp
A popular design of LED flashlight is a headlamp. Such a flashlight allows you to completely free your hands and direct the beam of light to the desired place by turning your head: following your gaze. This is convenient when repairing a car, walking in darkened areas, etc.
The scheme of such a luminaire is built according to the principle:
- control circuit (responsible for switching modes);
- buffer amplifier;
- a transistor switch to turn on the LED.
One of the variants of such device is when the control unit is made on a standard microcontroller (for example, ATtiny85), in which the control program of the emitter mode is written, the operational amplifier OPA335 serves as an intermediate and the field-effect transistor IRLR2905 is used as a key.
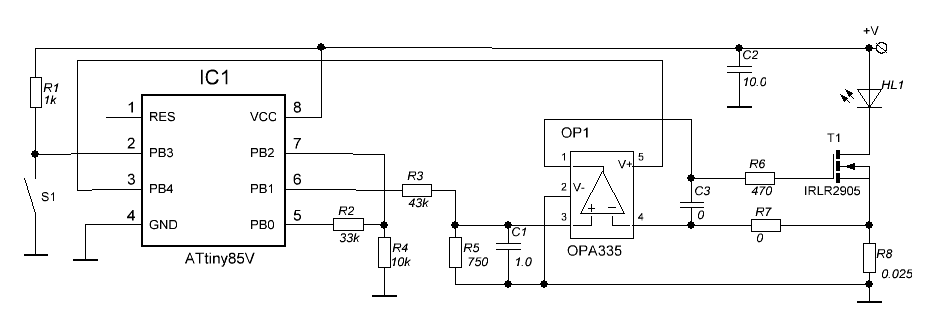
This circuit is inexpensive, reliable, but has a technological disadvantage: you have to program the controller before installation. Therefore, in mass production, a specialized chip FM2819 is used as a control unit (an abbreviated designation 819L may be applied to the casing). This chip can turn the light-emitting element on and off, and is programmed for four modes:
- maximum brightness;
- medium brightness;
- minimum brightness;
- strobe light (flashing light).
The modes are switched cyclically by a short press on the button. A long press puts the lamp in SOS mode. It is not possible to change the program (at least the datasheet does not mention such a possibility). It does not require any intermediate amplifier, but you can not connect very powerful LEDs directly to the output - there is a load limitation (and protection against load exceeding).

This is why powerful elements are connected via a switch. In most cases it is a field effect transistor that allows continuous high current drain circuit, like FDS9435A from Fairchild or similar, which you can choose from the FDS9435A datasheet.
| Structure | Maximum gate-source voltage, V | Channel resistance in open state | Maximum power dissipated, W | Highest drain current in continuous mode, A |
| P-channel | 25 | 0.05 Ohm at 5.3 A, 10 V | 2,5 | 5,3 |
The flashlight circuit is reduced to just two active elements and a harness of several capacitors and resistors (plus battery cells and a matrix of of LEDsof course).

Diagram of a rechargeable flashlight that charges from the 220V network
It is more convenient and economical to power the flashlight not from batteries, but from rechargeable batteries that can be recharged. Even more convenient to have such a flashlight, whose cells can be recharged without removing them from the body. It is sufficient to connect the flashlight to a single-phase 220V network.
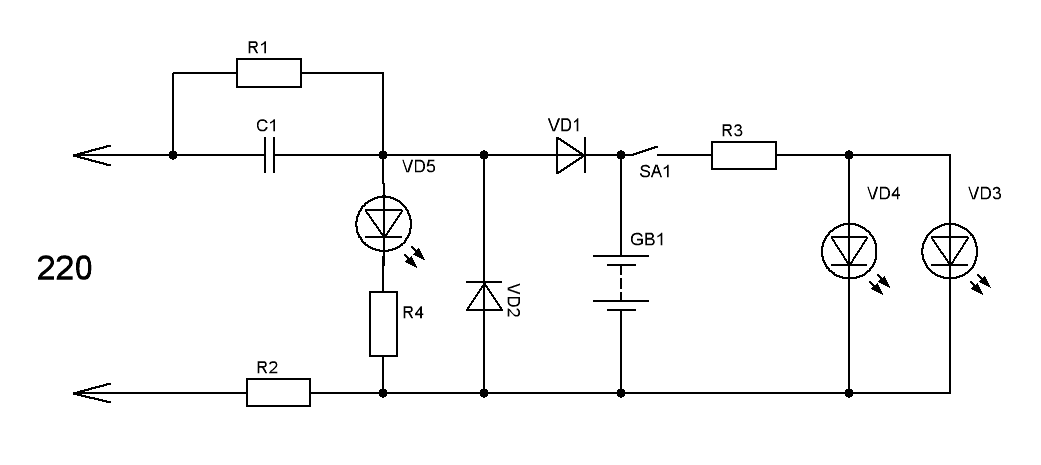
Here, elements are added to the usual circuit:
- half-period rectifier on diodes VD1, VD2 (can also be assembled in a bridge circuit);
- Ballast capacitor for extinguishing excessive voltage C1 with discharge resistance R1;
- resistor R2 to limit the battery charging current;
- R4VD5 chain to indicate the connection to the mains.
Important! These transformerless circuits have a significant disadvantage. If you accidentally touch any point of the circuit there is a risk of being energized. The use of the mains step-down transformer will lead to a significant increase in the weight and size characteristics.
Therefore, this scheme is found less and less often. For charging the batteries without removing them, external power sources with low output voltage are used (including charging from a USB-compatible device).
Flashlight Upgrades
A close examination of the circuit of the flashlight from the previous section, it becomes obvious that the LED VD5 is always on when it is connected to 220V. Its glow does not depend on the charge or even the presence of batteries. In order to eliminate this drawback, the indication circuit should be included in the battery charge circuit. To do this, you must install a 0.5 W resistor R5, so that at a current of 100 mA it drops about 3 V (about 30 Ohms). The indication circuit must be connected in parallel, observing the polarity.
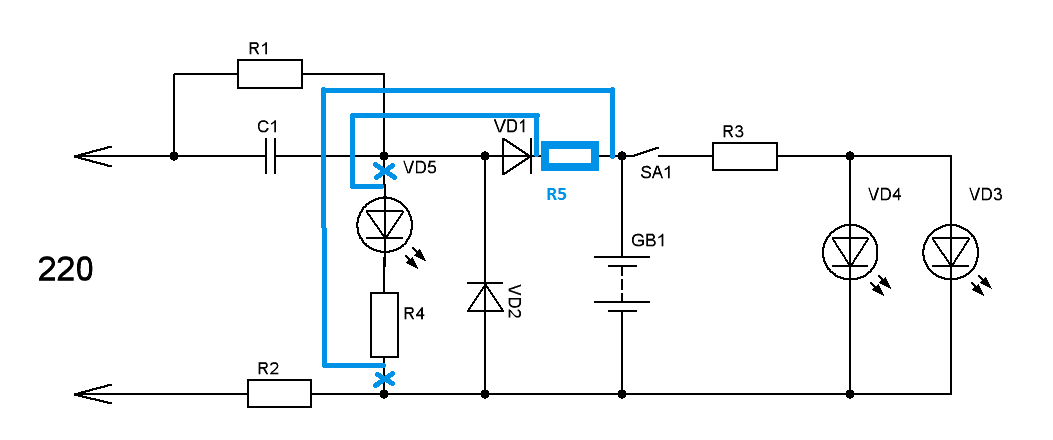
All changes and additions are shown with the blue line. After modification the LED will be lighted only with charging current (with emitter matrix power supply turned off!).

Functionality Check
If a Chinese flashlight is out of order, you can try to find the faulty element and replace it, or repair. The search algorithm is shown on the example of a flashlight with mains charging.
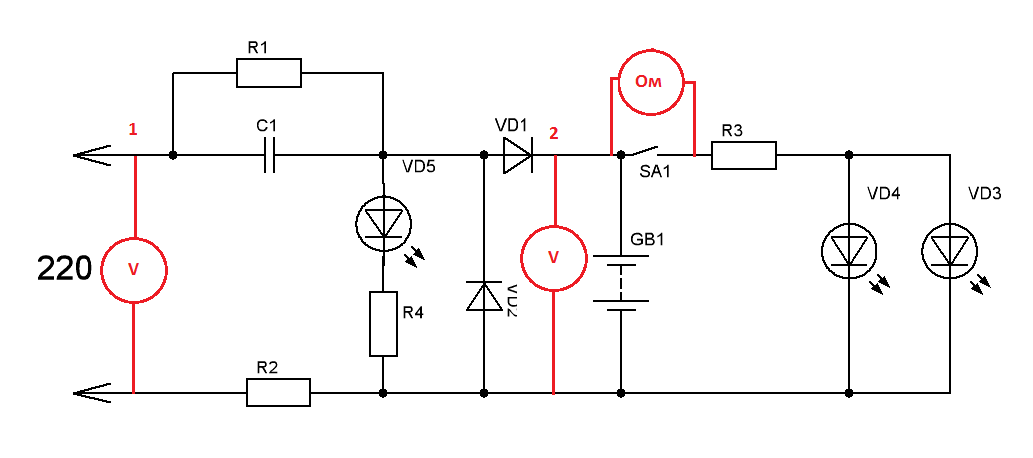
- If the lamp does not shine, the indicator does not light up when you turn it on, you should check whether 220 V is coming to the circuit. To do this, you must measure the AC voltage at point 1. If there is no voltage, you should check the power cord and plug.
- If everything is OK, the LED should be on. If not, check its circuit and also the diode VD2 for short circuit.
- Then remove the batteries and check the DC voltage at point 2 - it should be approximately equal to the battery voltage. If not, check if diodes VD1, VD2 are OK.
- If everything is OK, probably the batteries are faulty. Check the battery voltage.
- If this is not the case, you should check the functionality of the switch by testing it with a tester in the sound test mode (with the device unplugged and the batteries disconnected!).
- If everything is normal here too, the fault must be in the driver or in the LED matrix.
If you have a little knowledge in electrical engineering, it is not difficult to upgrade or repair the flashlight. The main thing is to understand its structure.